WordPress.org. Storefront wordpress
Тема Storefront сайт WordPress изменить и настроить ! — ТОП
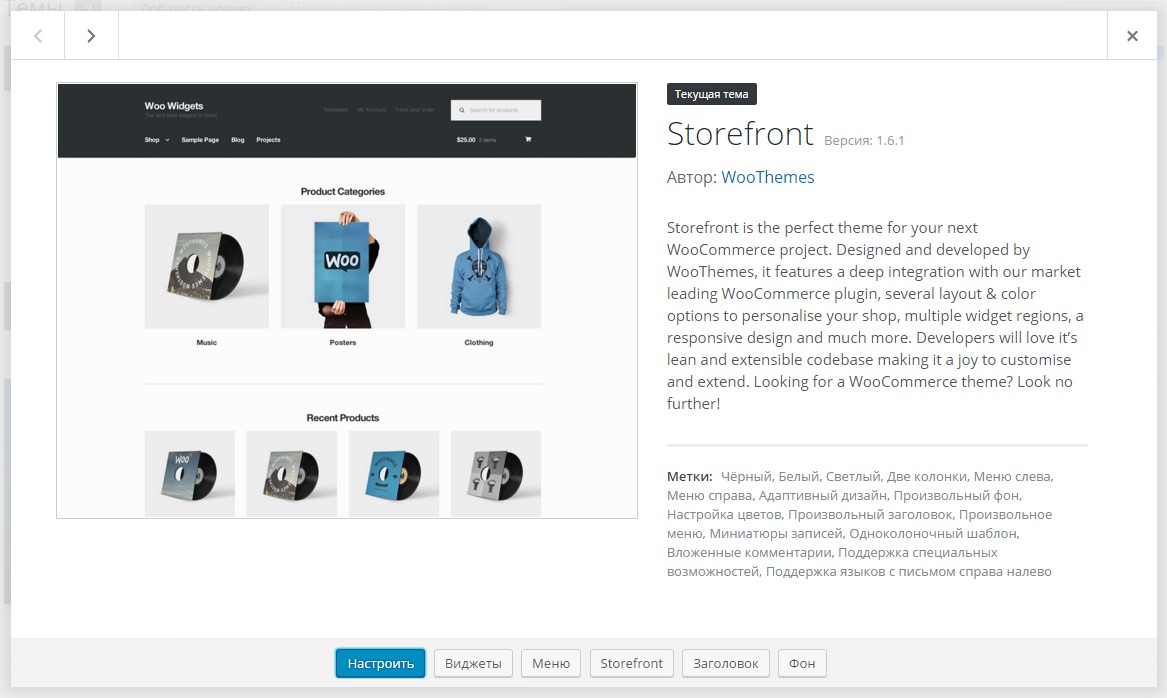
Тема Storefront была создана специально для плагина WooCommerce, для создания своего онлайн-магазина, хотя использовать тему можно и для создания обычного блога или сайта. Тема Storefront очень стильная и современная, обладает очень широкими настройками, вы сможете настроить тему так как вам хочется.
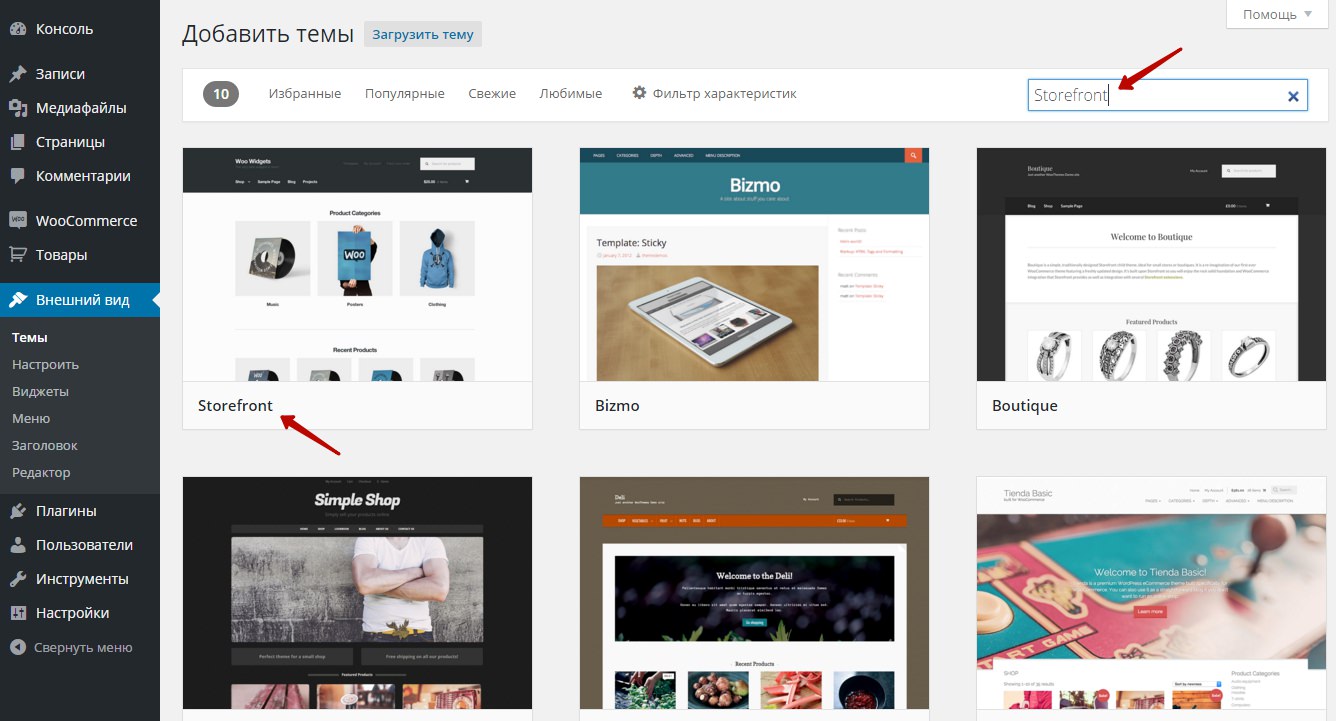
Установить тему вы сможете прямо из админ-панели wordpress. Перейдите на страницу: Внешний вид — Темы, вверху нажмите на кнопку — Добавить новую, введите в форму поиска название темы, нажмите Enter, установите и активируйте тему.
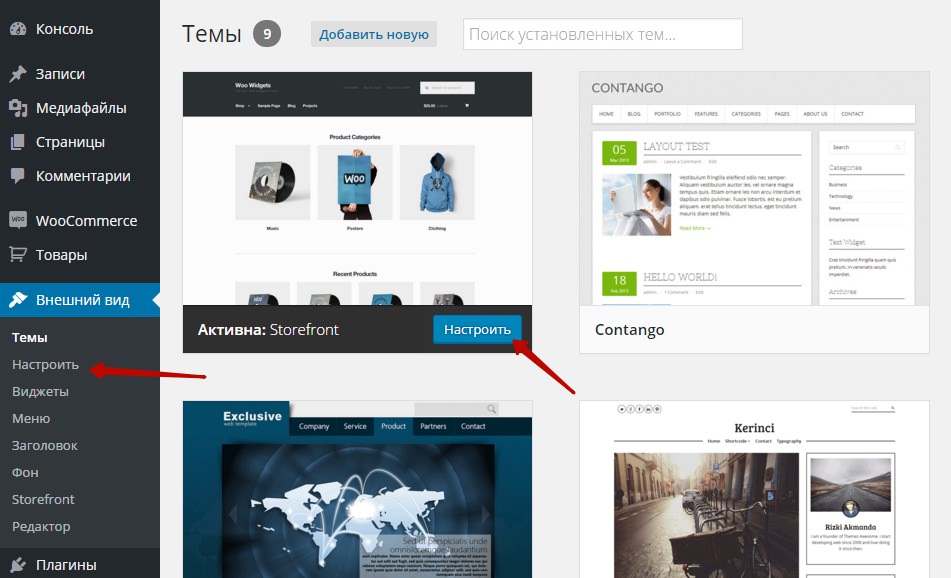
После установки и активации темы, перейдите на страницу: Внешний вид — Storefront, здесь вы можете ознакомиться с дополнительной информацией о теме.
— Можете приобрести дополнительные расширения.
— Можете посмотреть дочерние темы, которые были созданы на основе темы Storefront.
— Можно выбрать и установить бесплатные плагины, предназначенные для темы Storefront.
— Можете принять участие в развитие темы Storefront.

Настройка темы Storefront
Чтобы изменить и настроить тему Storefront, перейдите на страницу: Внешний вид — Настроить.
На странице Настроить, вы сможете настроить основные параметры темы, фон, цвета, описание, меню, типографика и т.д.
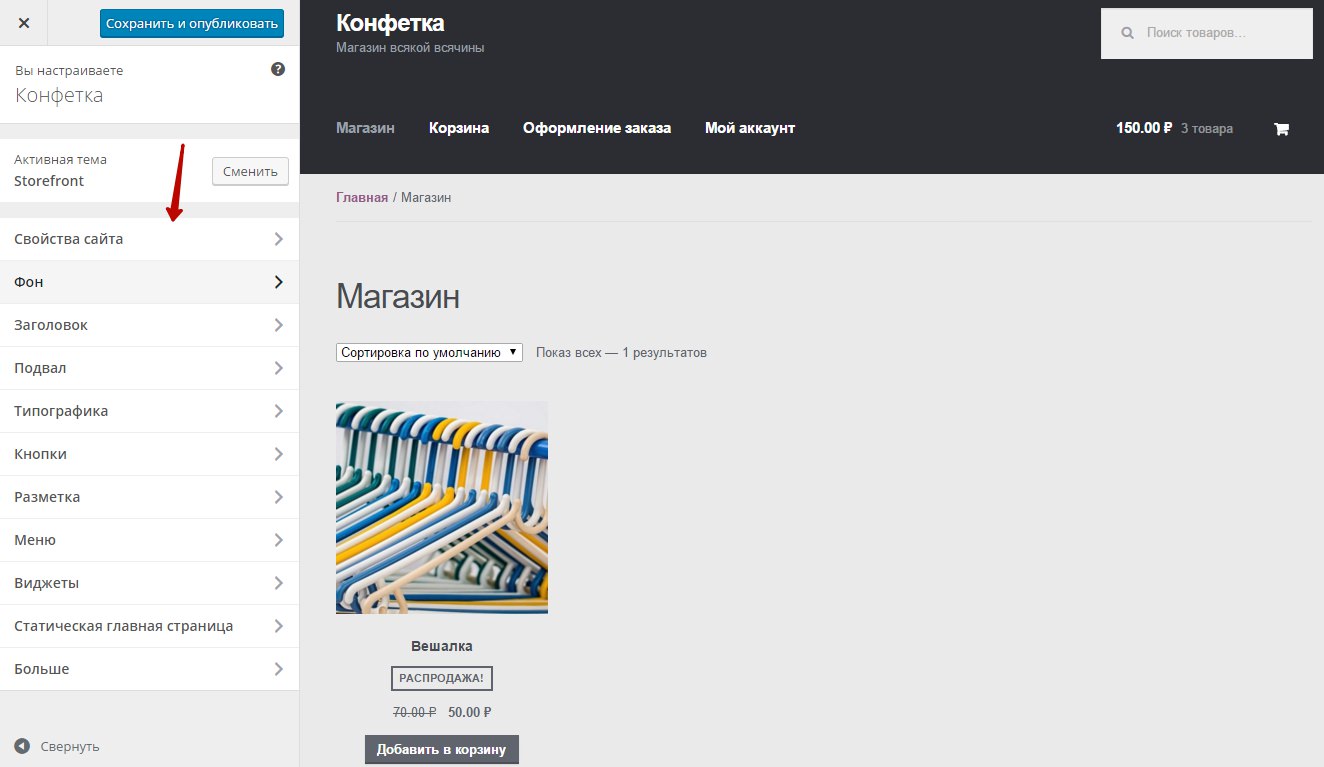
Свойства.
В свойствах сайта вы можете изменить название и краткое описание сайта. Можно загрузить иконку для сайта, которая отображается в браузерах и на экранах мобильных устройств.

Фон.
В настройках Фона, вы сможете изменить цвет фона темы или загрузить фоновое изображение.

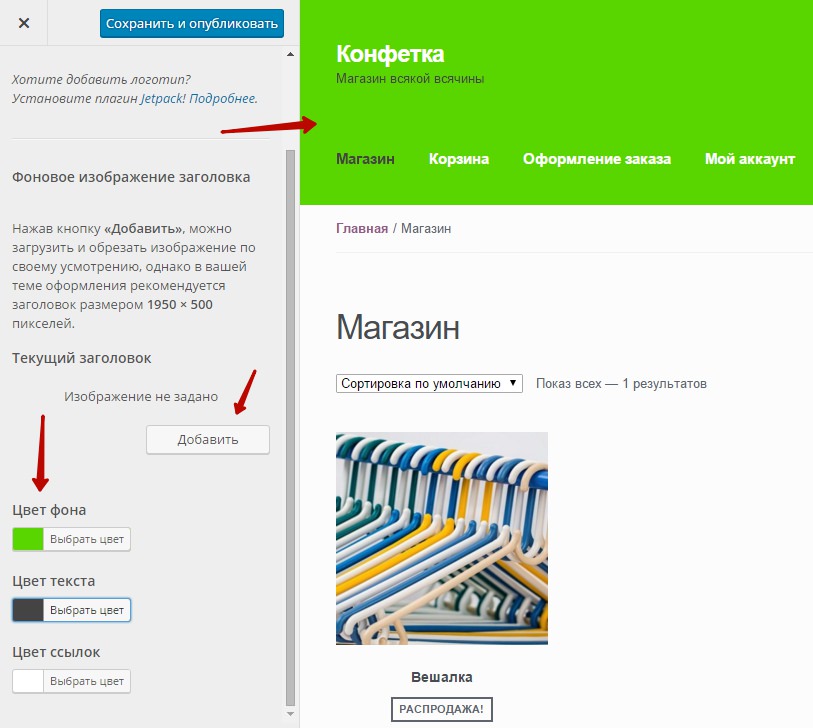
Заголовок.
В настройках Заголовка, вы сможете загрузить изображение в заголовок. Можно выбрать цвет фона заголовка, цвет текста и цвет ссылок.
Подвал.
В настройках Подвала, вы сможете выбрать:
— Цвет фона подвала.
— Цвет заголовка подвала.
— Цвет текста подвала.
— Цвет ссылок подвала.

Типографика.
В настройках Типографики, вы можете выбрать:
— Цвет заголовков в содержании.
— Цвет текста в содержании.
— Цвет ссылки при выделении или при нажатии.

Кнопки.
В настройках Кнопки, вы сможете выбрать:
— Цвет фона кнопок.
— Цвет текста кнопок.
— Цвет фона альтернативной кнопки, когда при нажатии на основную кнопку, появляется дополнительная.
— Цвет текста альтернативной кнопки.

Разметка.
В настройках Разметки, вы сможете выбрать расположение боковой панели. Можно указать, чтобы боковая панель отображалась слева.

Остальные параметры.
— Меню, в настройках меню, вы можете указать какое меню должно отображаться на сайте. Если у вас нет меню, то вы можете создать его. Лучше управлять меню на странице: Внешний вид — Меню.
— Виджеты, в настройках виджетах, вы можете выбрать виджеты для сайдбаров. Лучше управлять виджетами на странице: Внешний вид — Виджеты.
— Статическая главная страница, здесь вы можете выбрать страницу, которая будет главной. В качестве главной можно указать любую страницу на вашем сайте.
— В конце, чтобы сохранить сделанные изменения, нажмите вверху на кнопку — Сохранить и опубликовать.
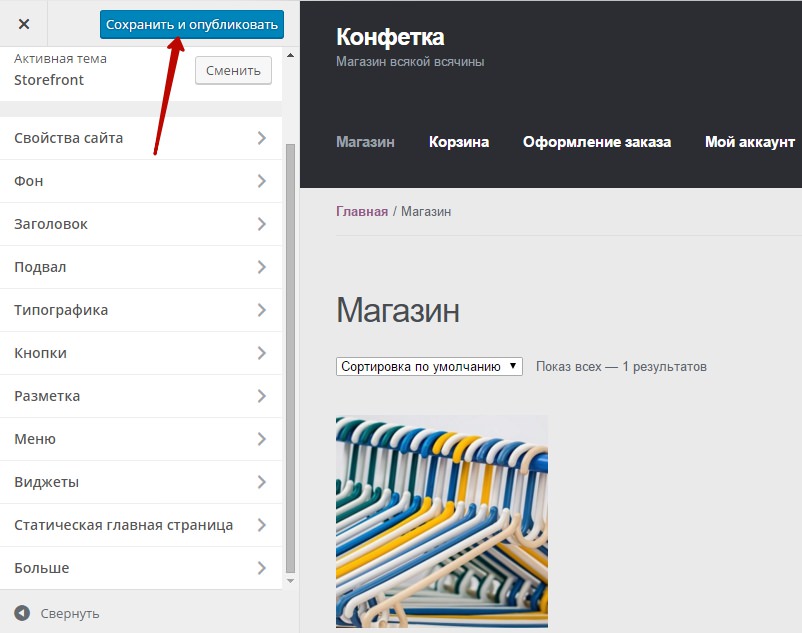
После сохранения настроек все сделанные изменения вступят в силу и отобразятся на вашем сайте.

info-effect.ru
CB Storefront | WordPress.org
CBengine Storefront Plugin for WordPress generates a basic «mall» of ClickBank Categories and Products on a page of your WordPress Blog. Simply enter the [cbstorefront] shortcode on any page in your WordPress Blog and the Storefront will be presented on that page.
Products are searchable by keyword or ClickBank marketplace category.
The ClickBank Product Database is Self-Updating.
Easy to install. Just add this shortcode to any WordPress page:
[cb-storefront] Storefront Screenshot - Organized by ClickBank Categories and includes a Search box that will present products by Key Phrase.
 ClickBank Category Product Details, shows listing of product with descriptions, etc. and includes your ClickBank affiliate ID into each purchase link (Blue Product Title) so you earn a commission for every sale. Visitors can navigate back to primary categories or full marketplace, or search by keyword on any page in the Storefront.
 CB Storefront admin area in wp-admin section prompts you to enter your ClickBank ID so that all affiliate sales are tracked to your ClickBank account.
- Upload the entire cb-storefront folder to the /wp-content/plugins/ directory
- Activate the plugin through the ‘Plugins’ menu in WordPress
- Enter your ClickBank Affiliate ID in the Admin area under Settings >> CB Storefront
- From the WordPress admin menu, click Pages >> Add New
- Then type [cb-storefront] into the Page Content section.
Products are automatically updated through the CBENGINE feed.
How is my affiliate commission tracked?ClickBank affiliate accounts are free at ClickBank.com. SImply sign up and receive an affiliate ID, then enter that ID into your CB STorefront Options. This will generate a purchase link with your affiliate ID in the URL, and this will be tracked by ClickBank whenever a purchase is made. You can Log Into your ClickBank account to review all affiliate purchases that have been made.
«CB Storefront» — проект с открытым исходным кодом. В развитие плагина внесли свой вклад следующие участники:
ru.wordpress.org
Storefront Header Picker | WordPress.org
Описание
Lets you pick a header layout for Storefront theme.
This plugin is built to work only for the Storefront theme.
How to use:
- On your WordPress Dashboard, go to «Appearance» and click on «Customize».
- Find the «Header» section
- Choose either default, compact, or centered layout
- Choose either to hide/unhide the product search box in the header.
- Choose either to hide/unhide mini cart in the header.
Note:The compact layout can only hold either one of the search box or the mini cart.
Скриншоты
 Here's a screenshot the header layout section.
 Here's a screenshot when centered layout is selected.
 Here's a screenshot when compact layout is selected.
Установка
Install via the WordPress Dashboard:
- Login to your WordPress Dashboard.
- Navigate to Plugins, and select «Add New» to go to the «Add Plugins» page.
- Search for «Storefront Header Picker» in the search input bar, and hit your enter key.
- Click «Install», and wait for the plugin to download. Once done, activate the plugin.
Install via FTP:
- Extract the zip file, login using your FTP client, and upload the storefront-header-picker folder to your /wp-content/plugins/ directory
- Login to your WordPress Dashboard.
- Go to «Plugins» and activate «Storefront Header Picker» plugin.
Часто задаваемые вопросы
Installation InstructionsInstall via the WordPress Dashboard:
- Login to your WordPress Dashboard.
- Navigate to Plugins, and select «Add New» to go to the «Add Plugins» page.
- Search for «Storefront Header Picker» in the search input bar, and hit your enter key.
- Click «Install», and wait for the plugin to download. Once done, activate the plugin.
Install via FTP:
- Extract the zip file, login using your FTP client, and upload the storefront-header-picker folder to your /wp-content/plugins/ directory
- Login to your WordPress Dashboard.
- Go to «Plugins» and activate «Storefront Header Picker» plugin.
No. This plugin was designed to work for the Storefront theme, utilizing Storefront’s action hooks and filters. Activating the plugin while using a different theme will trigger a warning.
I’ve activated the plugin. Where can I access the settings?The settings for this plugin can be found in the Customizer page under Appearance. In that page, find the section named «Header».
I want to use Storefront Designer. Will it have a conflict on the header layout?When you have Storefront Designer enabled, the layout picker of Storefront Header Picker will be disabled. The Storefront Designer’s layout picker will have priority to avoid CSS conflicts with two layout pickers enabled. The checkboxes to disable/enable the product search bar and the cart menu dropdown will be the only function that will work.
Отзывы

ru.wordpress.org


